QHY5III174M First light
(This article is written in both Japanese / English.)
目次
人生初のモノクロカメラ My first monochrome camera
前の記事でも触れたように、とうとうモノクロカメラを使ったRGBカラー合成に手を出してしまいました。
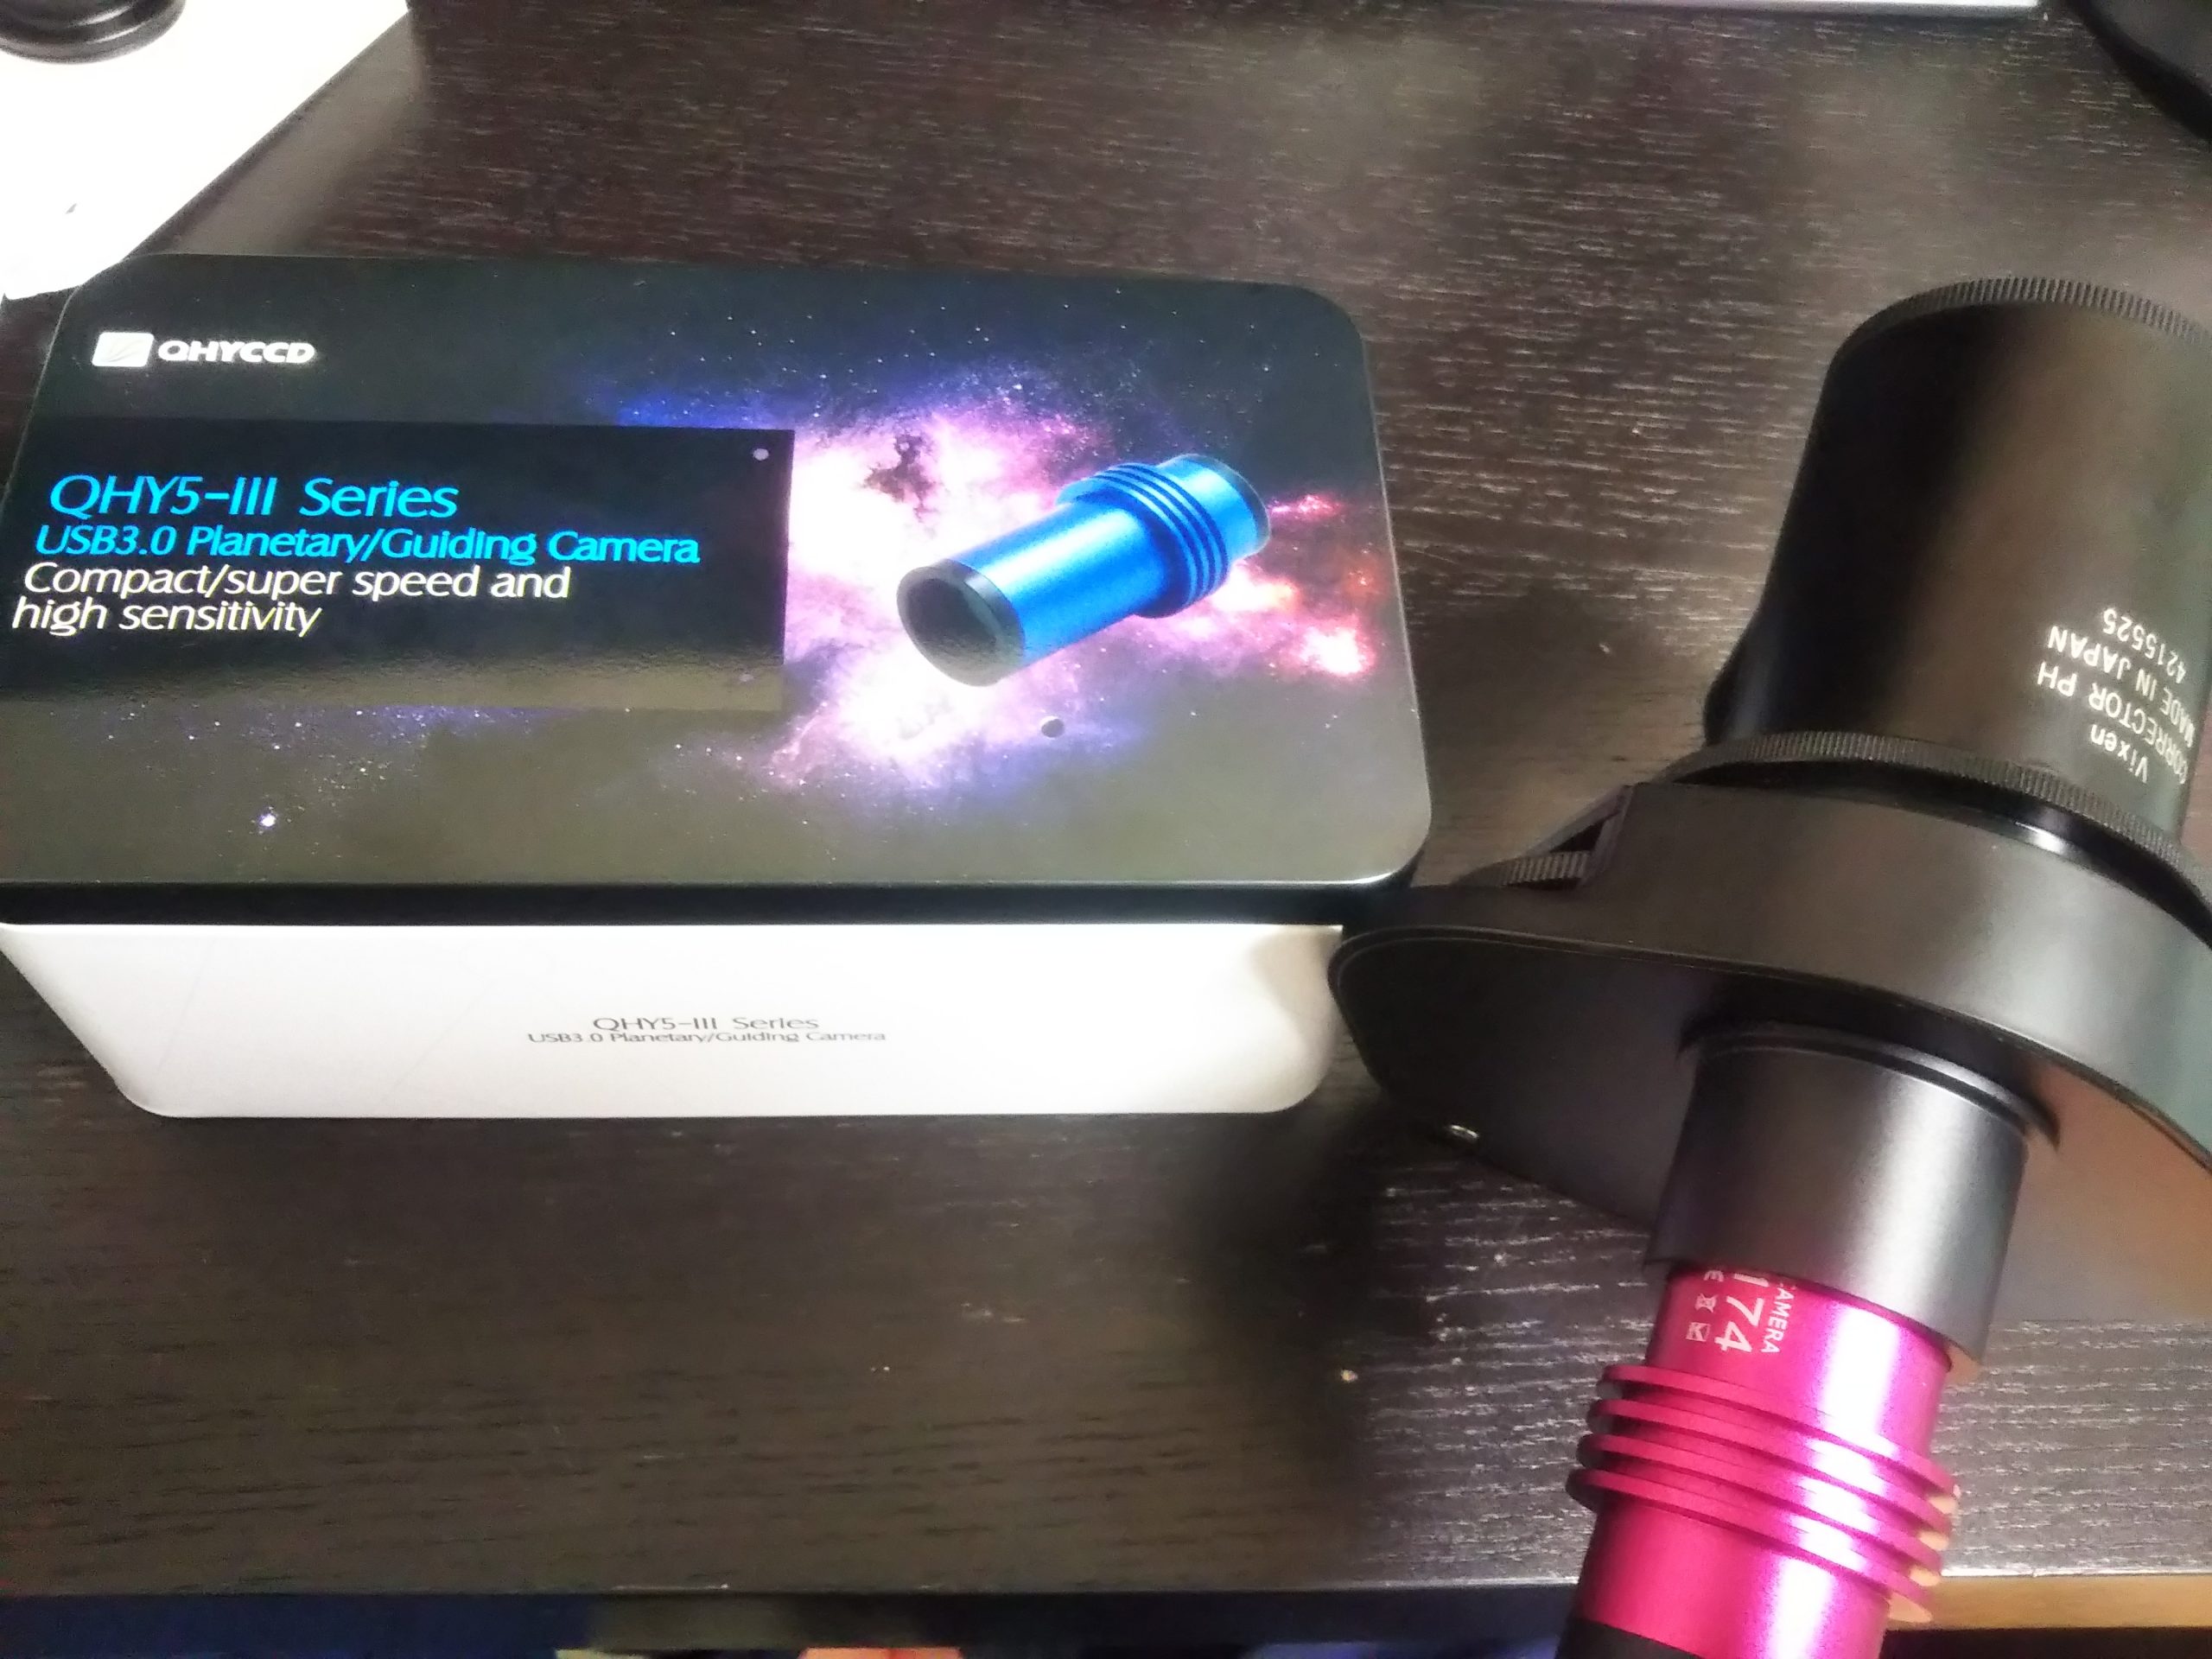
当然お金に余裕がないので、小サイズセンサのQHY5III174M を購入しました。
こちらのカメラは、1/1.2 インチサイズ(センササイズ 11.34×7.13 mm)のIMX174という、比較的小さなセンサを搭載しています。画角が狭くなるデメリットはありますが、逆に言うと、小さい対象を撮るのに適したセンサともいえます。
さて、私の夢は、モノクロカメラによるLRGBカラー合成でした。LRGBカラー合成にはフィルタとフィルタホイールが必要です。フィルタの径については、センササイズが小さいことからΦ31.7 mm径で十分と考え、ZWOのLRGBフィルタセットを購入しました。フィルタホイールについては、電動にしたいところではありますが、重いため接眼部への負担が大きくなること、価格も高価になることから、こちらの手動フィルタホイールとしました。
フィルタホイールについては、手動で交換しなければならず、寝ながらの撮影が難しくなったため、やや後悔しています。ただし、フィルタ間のピントずれがない点は朗報です。フィルタだけを交換して、すぐに撮影に進めます。
As I mentioned in the previous article , I finally started working on RGB color composition using a monochrome camera.
Of course, I couldn’t afford larger sensor camera, so I bought the small size sensor camera QHY5III174M .
This camera is equipped with a relatively small sensor called IMX174, which is 1 / 1.2 inch in size (sensor size: 11.34 x 7.13 mm).
It has the disadvantage of narrowing the field of view, but conversely, it can be said to be a sensor suitable for shooting small objects.
My dream was to photograph LRGB color composition image with a monochrome camera. A filter and filter wheel are required for LRGB color composition. Regarding the filter diameter, I thought that a diameter of Φ31.7 mm would be sufficient for this small sensor, so I purchased ZWO LRGB filter set . Regarding the filter wheel, I would like to prepare electric filter wheel at first. However, by considering its weight and price, I chose this manual filter wheel .
I regret buying the manual filter wheel because I had to replace the filter manually, which made it difficult to shoot while sleeping in my car. However, the good news is that there is no change in focus position in each filter. I can only replace the filter and proceed to shooting immediately.
撮像パラメータの設定 Setting of parameters for imaging
天体用CMOSカメラに限った話ではありませんが、撮影条件を決定するにあたり、適切なパラメータを検討する必要があります。主要なパラメータは次の3つと考えています。
- 露光時間
- ゲイン
- オフセット
It is not limited to astronomical CMOS cameras, but it is necessary to determine appropriate parameters for imaging. These three main parameters were taken into account;
- Exposure time
- gain
- offset
露光時間 Exposure
露光時間については、換算焦点距離が大変な長焦点となること、銀河の撮影であれば解像感を重視することから、シーイングやガイドエラーの影響を受けにくいよう、短時間の露出として枚数を増やすこととしました。そこで、1フレームあたりの露光時間は15 sとしました。
Since the equivalent focal length is a very long and a sense of resolution is important for galaxy images, I set the exposure time shorter not to be effected by atmospheric seeing and guiding error. Therefore, the exposure time for each subframe was set to 15 s.
ゲイン Gain
ゲインについては人によって考え方が異なるところと聞いていますが、私個人としては、ダイナミックレンジが最大となるゲインで使用するのが最適と考えています。
QHY5III174Mのゲインとダイナミックレンジの関係を見つけることができなかったため、同センサのIMX174を搭載した類似機種(ASI174MM)における、ダイナミックレンジとゲインの関係を確認しました。
I’ve heard that different people think about gain differently, but I personally think it’s best to use it at the gain that maximizes the dynamic range.
Since I could not find the relationship between the gain and dynamic range of the QHY5III174M, I searched for the relationship between the dynamic range and gain in a similar model (ASI174MM) equipped with the same sensor, IMX174.
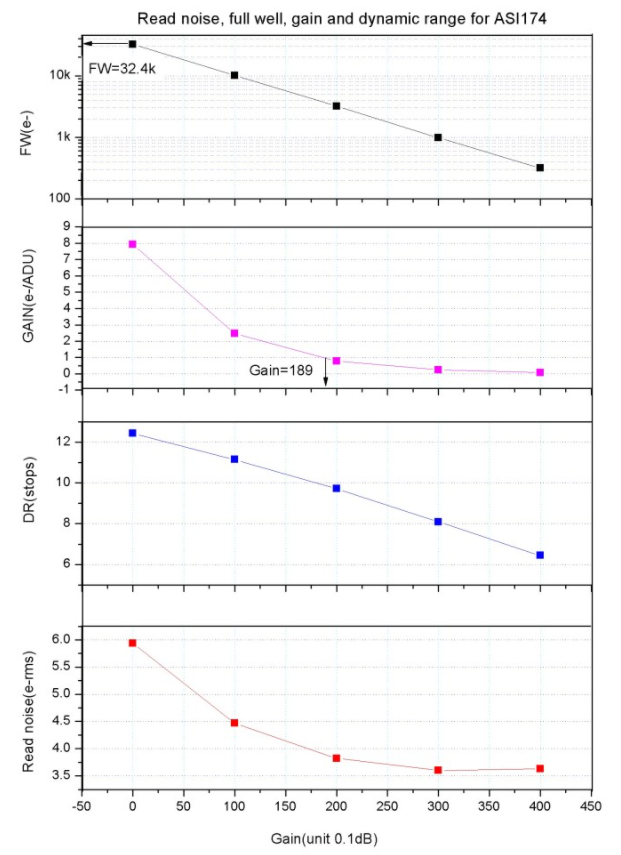
グラフより、ダイナミックレンジはゲイン0で最大となり、ゲインが上がるにつれて単調減少することがわかります。そこで、撮影時のゲインは0とすることにしました。
The graph shows that the dynamic range is maximal at a gain of 0 and decreases monotonically as the gain increases. Therefore, I decided to set the gain at the time of shooting to 0.
オフセット Offset
オフセットとは、センサが吐き出す信号が0やマイナスの値とならないために、出力結果に加えられている定数となります。(下駄を履かせて、出力値全体を持ち上げる) 通常のデジタル一眼レフカメラでは、このオフセット値を変更することができませんが、天体用CMOSカメラでは、この値は可変のパラメータとなっています。
The offset is a constant added to the output signal in order to avoid zero or negative value output. (Raising the overall output value) This offset value cannot be changed with a normal DSLR camera, but with a CMOS camera for astronomical purposes, this value is a variable parameter.
そこで、Nabeさんのブログを参考に、オフセット値を変えたときのバイアスフレームの輝度を調査しました。
バイアスフレームの撮影条件は下記としました。
Therefore, referring to Nabe’s blog , I investigated the relationship between the luminance of bias frame and offset.
The imaging conditions for the bias frame are as follows;
- Gain: 0
- Offset: 0-70 (0-8, 12-20: offset increment per 2, 8-12: per 1, 20-70: per 10)
- Exposure: 10 usec (1 frame)
- Temp: N/A (This camera has no temp. sensor, RT≒17.0 ゚C)
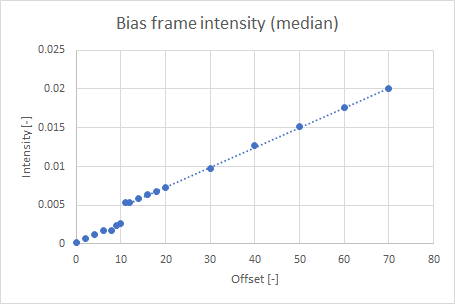
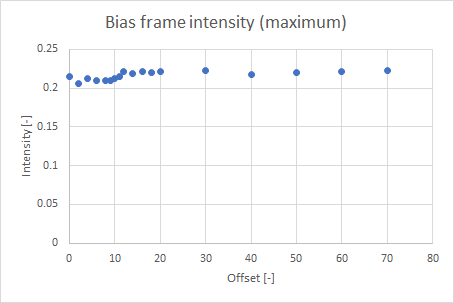
輝度値の読み取りには、PixInsightの “Statistics”プロセスを使用しました。撮影したバイアスフレームを読み込み、輝度値のmax., median, min.をそれぞれ記録しました。このとき、輝度値は正規化された値(値が0-1の間を取るようにした値)となっています。
“Statistics” process of PixInsight was used to read the luminance values. Maximum, median, and minimum luminance values of the captured bias frames were recorded. At this time, the luminance value shows a normalized value (a value that is set to be between 0-1).
確認結果は下図の通りとなります。
図より、Gain 10を境に、挙動が変化していることがはっきりとわかります。Gain 0-8では、min., medianの値ともに、一定値(2.4×10⁻⁴)を取っています。厳密にゼロではありませんが、この値が、このカメラが吐き出す出力値のゼロとなる点と考えられます。つまり、Gain 8以下では、出力値の最小値がゼロに張り付く可能性があります。
Gain 10以上では、オフセットが増加するにつれて、輝度値が線形に増加していることがわかります。この状態であれば、出力値の最小値がゼロに張り付かないため、オフセット値として適切であると考えました。
オフセット値が大きくなりすぎるとダイナミックレンジが縮小してしまうこと、下限ギリギリを設定してしまうと、輝度のばらつきによってはゼロに張り付く可能性があることを考慮し、このカメラで撮影する際のオフセット値は15としました。
なお、輝度のmax.値は、min., medianとは異なり、オフセットによらずほぼ一定の値となっています。詳細な検証は未実施なものの、カメラに通電し続けて発熱するにつれて輝度値が大きくなっていったことから、こちらの値はセンサの熱ノイズ由来であると考えています。
The result is as shown in the figure below.
From the figure, you can clearly see that the behavior has changed around gain of 10. At Gain 0-8, both the min and median values remain constant (2.4 x 10 -4 ). Although this value is not exactly zero, this value is considered to be the point at which the output value of zero. In other words, below Gain 8, the minimum output value can stick to zero.
At Gain 10 or more, the min. and median luminance value increases linearly as the offset increases. In this area, the minimum output value does not stick to zero, so I thought it would be an appropriate offset value.
Considering that if the offset value becomes too large, the dynamic range will be reduced, and if the lower limit is set, it may stick to zero depending on the variation in luminance, the offset value was set to 15.
Unlike min. and median, the max. luminance value is almost constant regardless of the offset. Although detailed verification has not been carried out, the luminance value increased as the camera continues operating and generating heat, so it seems that this value is derived from the thermal noise of the sensor.

撮影結果 Result
月 Moon
導入したその日から好天に恵まれたため、ファーストライトとして、早速月を撮影してみました。人生初のRGB合成です。
今回の撮影では、Lの撮影を省略し、RGBのみの取得としています。800フレームを撮影し、品質の良い順から80%をスタック後、RGB合成を行っています。
I was lucky enough to have a clear sky on the day I purchased the camera, so I immediately took a picture of the moon as a first light. This is the first RGB composition in my life.
This time, the shooting of L is omitted and only RGB subframes are captured. After capturing 800 subframes and stacking 80% in order of quality, RGB composition is carried out.
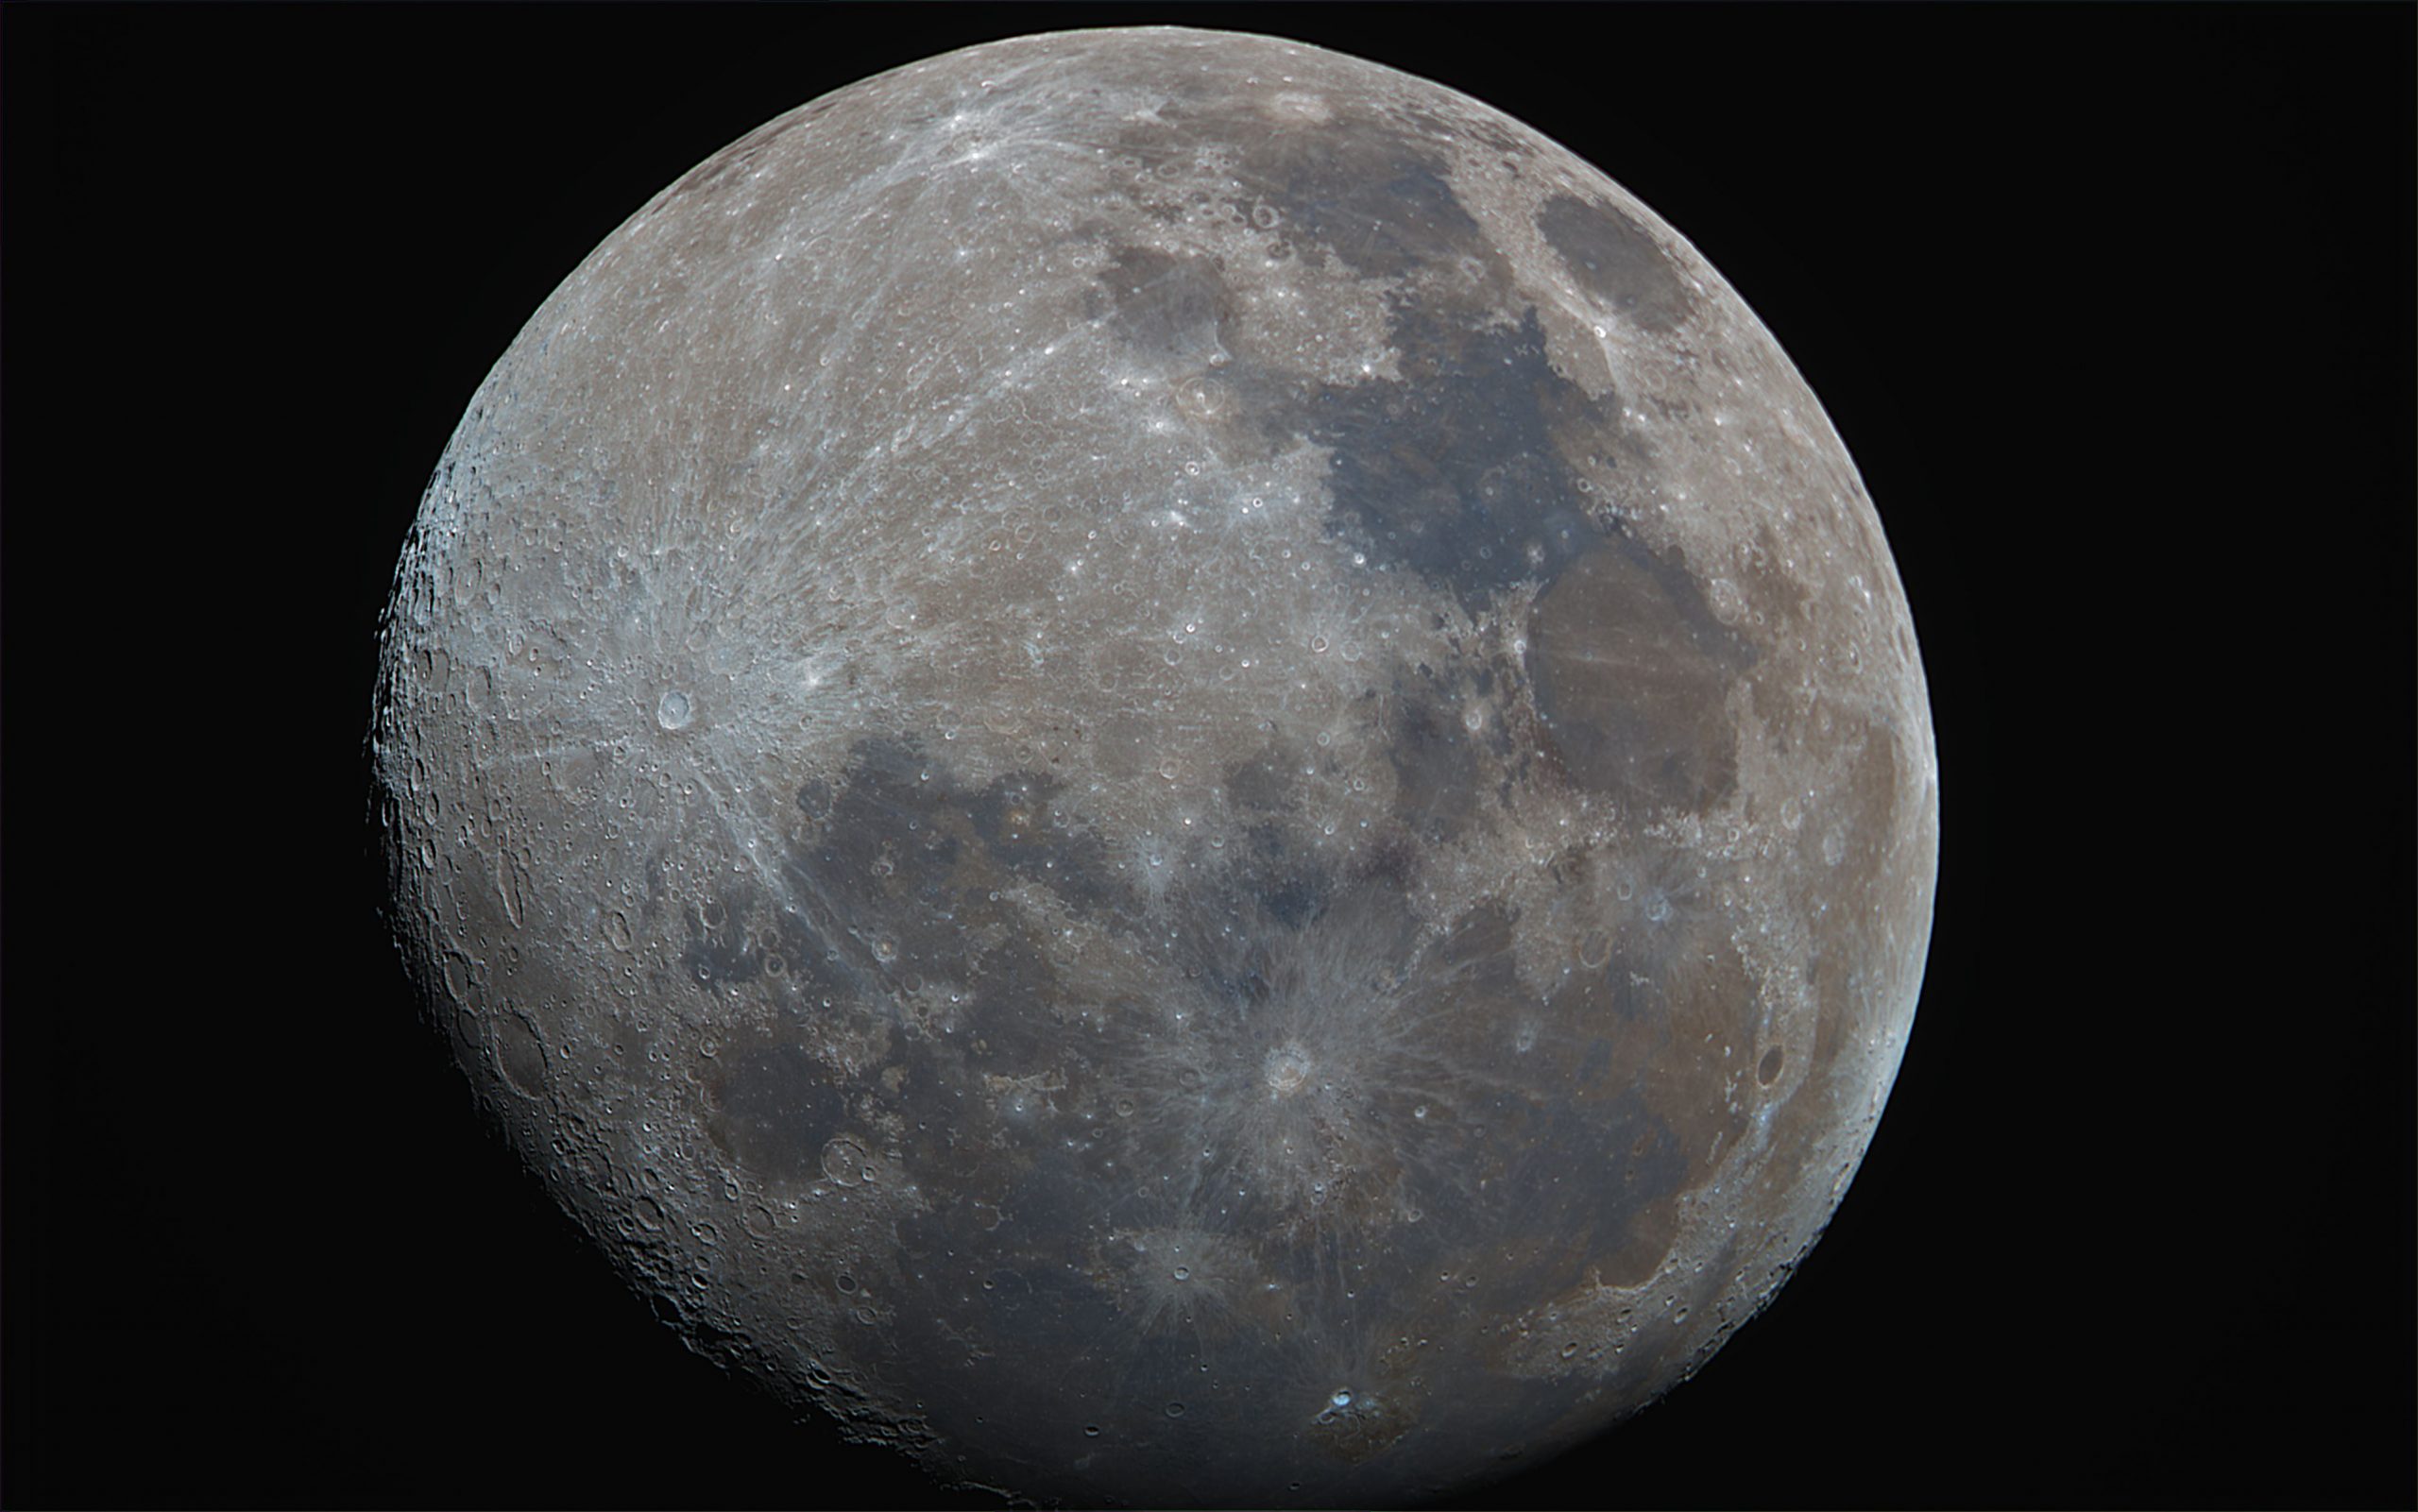
| Optics | Vixen R200SS |
| Corrector | Corrector PH |
| Filter | ZWO LRGB Filter Set |
| Focal length | 760 mm |
| F stop | F3.8 |
| Camera | QHYCCD QHY5III174M |
| Gain | 0 |
| Offset | 68 |
| Binning | 1×1 |
| Exposure | R: 800×1 ms G: 800×1 ms B: 800×1 ms Stacked 80% of subframes |
| Date | 26-Mar. 2021 22:07- |
| Mount | SkyWatcher EQ6R |
| Guiding | No autoguiding |
| Software | SharpCap, AutoStakkert!3, ImPPG, Registax 6, PixInsight |
DSO
本来の目的であるDSOの撮影を行いました。対象はM63, 今回はLも撮影してのLRGB合成としています。
当日はシーイングに恵まれたこともあり、銀河のディテールが出てきたと思います。L別撮りにより解像感もよくなり、購入した甲斐があったなという結果になりました。
I captured DSO, which is the original purpose for purchasing this camera. The target is M63, this time L frames are also captured and LRGB composition is carried out.
I think that the details of the galaxy came out because of the good seeing on that day. The sense of resolution was improved by taking L frames separately.
The result was well worth the purchase.
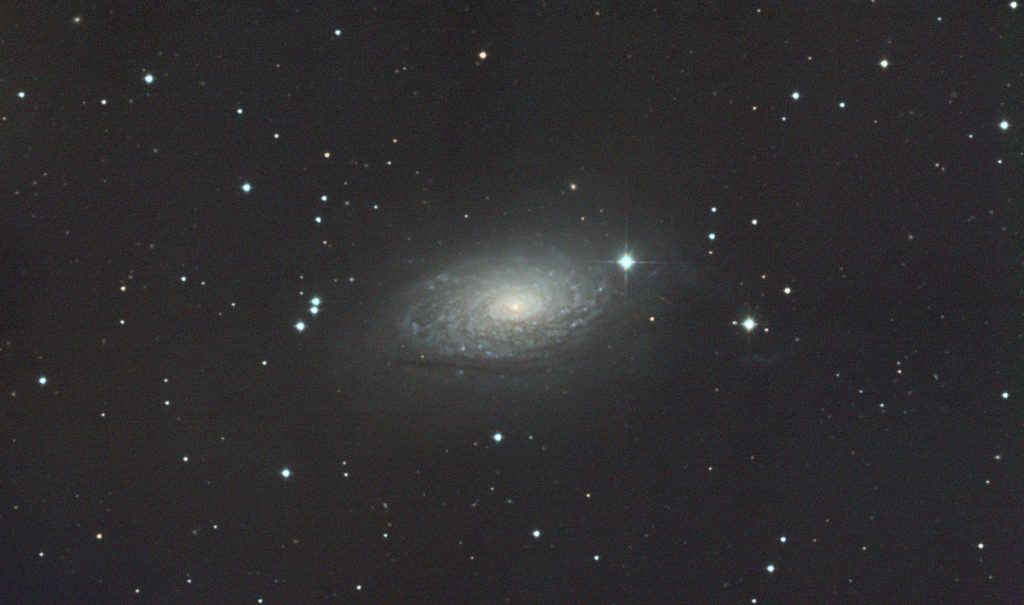
| Optics | Vixen R200SS |
| Corrector | Extender PH |
| Filter | ZWO LRGB Filter Set |
| Focal length | 1120 mm |
| F stop | F5.6 |
| Camera | QHYCCD QHY5III174M |
| Gain | 0 |
| Offset | 15 |
| Binning | 1×1 |
| Exposure | L: 523×15 s R: 207×15 s G: 194×15 s B: 223×15 s (Total: 287 min) |
| Date | 10-Apr. 2021 19:48- |
| Mount | SkyWatcher EQ6R |
| Guiding | Autoguiding w/ 130 mm Guide scope, QHY5L-IIM, PHD2 |
| Software | Astro Photography Tool, PixInsight, Photoshop |
初めてのモノクロカメラは大満足の結果に終わりました。
これから夏シーズンに入り、天の川周辺の散光星雲を撮るのが楽しみです。
My first monochrome camera was so much satisfying for me.
I’m looking forward to capturing diffuse nebula around milky way in the upcoming summer season.
“QHY5III174M First light” への5件の返信